Installation for Android
This page summarizes the steps to build FW4SPL on Android.
Warning
Work in progress
Android environnement
The following tools are necessary:
- JDK >= 6 (JRE only is not sufficient)
- Gradle 2.13 ou more recent
Note
On Linux, openjdk is also reported to work well. You can easily install it with the packaging tools of your favorite distribution.
Note
Since OSX 10.10 (Yosemite), JDK 8 is the minimal requirement.
SDK install
The SDK is a set of libraries and development tools necessary to build, test and debug and Android application. The initial archive you will download contains only the basic tools of the SDK. It doesn’t contain any version of the API (Android Platform) and doesn’t provide the whole set of tools you actually need to develop an application.
Download the SDK archive:
Extract the archive
Set the environment variable ANDROID_SDK to its actual path
# i.e for Linux and OSX
export ANDROID_SDK=/ABSOLUTE/PATH/TO/THE/ANDROID_SDK
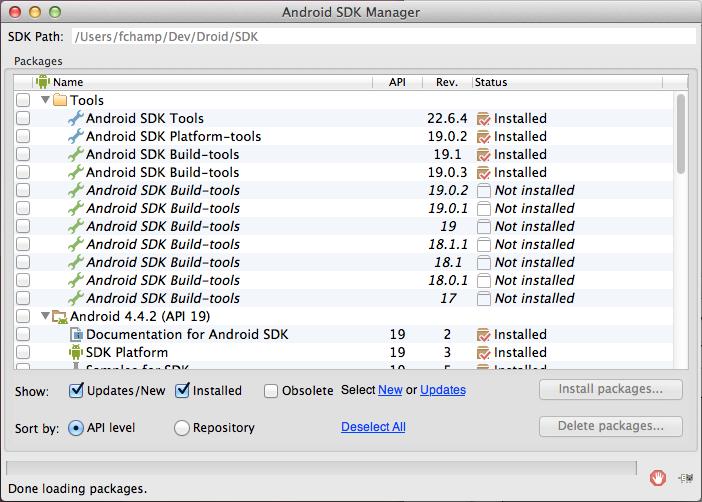
The SDK Manager tool ease the downloading and the management of the different SDK versions, as well as the downloading of the development tools:
- On Windows, SDK Manager.exe is located in the SDK root folder
- On Linux and OSX, launch the following command in the SDK root folder :
./tools/android sdk
- You can also update the sdk directly through the command line:
./tools/android update sdk —no-ui
After that, you have to download at least one version of the API and one Platform-tools version. The latter contains the build tools (adb, etc…) and are updated independently of the SDK. More informations can be found here.
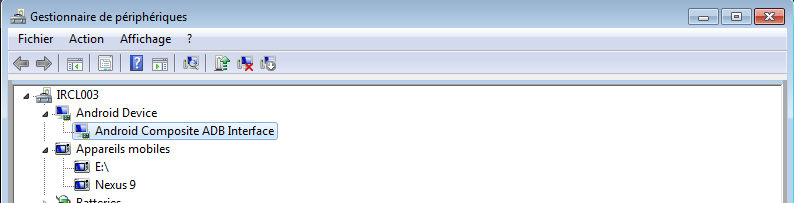
Warning
For the Windows users, it can be interesting to check that adb is well installed for your device by using the peripheral manager. If it’s not the case, please try to update the drivers of your tablet/phone.
NDK install
The NDK is the tool allowing people to develop some parts of your application using native code (C/C ++). It also contains the system headers necessary to link successfully your librairies with the latest releases :
- libc (C library) headers
- libm (math library) headers
- JNI interface headers
- libz (Zlib compression) headers
- liblog (Android logging) header
- OpenGL ES 1.1 and OpenGL ES 2.0 (3D graphics libraries) headers
- libjnigraphics (Pixel buffer access) header (for Android 2.2 and above).
- A Minimal set of headers for C++ support
- OpenSL ES native audio libraries
- Android native application APIS
The NDK also provides a build system which will allow you to compile your source code without taking care of the toolchain/platform/CPU/ABI (ABI = Application Binary Interface). You have to ensure to have the latest version of the SDK. Indeed, the NDK is compatible with the previous versions of the Android API, but this is not the case for the Platform tools.
- Download the NDK for your host platfom here and extract the zip archive.
More informations can be found here.
Configuration for FW4SPL
In order to obtain an Android development environment compatible with FW4SPL and its third-party libraries, you must fulfill the conditions below.
The APIs <= 8 (Froyo) are not supported because of compilation error in boost. Thus it is recommended to install the SDK Manager with the following versions versions:
- Tools:
- Android SDK Tools >= 23.0.5.
- Android SDK Platform-Tools >= 21.
- Android SDL Build-tools >= 21.0.2.
- Android 4.4.2 (API 21):
- SDK Platform >= 21.
- On top of that, Qt 5.x does need multiple versions of the API (only download the SDK Platform):
- API 10 and 11 for QtMultimedia.
- API 16 for QtBase.
So don’t forget to install them before building the FW4SPL deps.
You must also add the following environment variables.
ANDROID_NDK=/PATH/TO/NDK
ANDROID_SDK=/PATH/TO/SDK
JAVA_HOME=/PATH/TO/JDK
Please remember that JAVA_HOME is the root folder of the JDK and not the binary folder.
Warning
For windows, the path to the JDK binaries (java, javac, etc…) must also be in the PATH environment variable.
Source tree layout
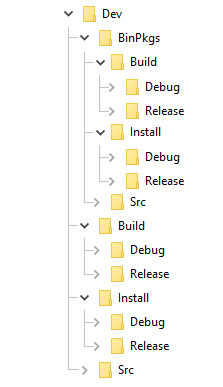
Good practices in FW4SPL recommend to separate source files, build and install folders. So to prepare the development environment, we propose to follow this layout:
Create a development folder (Dev)
Create a build folder (Dev/Build)
- Add a sub folder for Debug and Release.
Create a source folder (Dev/Src)
Create an install folder (Dev/Install)
- Add a sub folder for Debug and Release.
To prepare the third party environment:
Create a third party folder (BinPkgs)
Create a build folder (BinPkgs/Build)
- Add a sub folder for Debug and Release.
Create a source folder (BinPkgs/Src)
Create an install folder (BinPkgs/Install)
- Add a sub folder for Debug and Release.
Of course you can name the folders as you wish, or choose a different layout, but keep in mind to not build inside the source directory. This is strongly discouraged by CMake authors.
Dependencies
First, we need to build the third-party libraries. We will now fetch the scripts that allow to build them and then launch the compilation.
Clone the following repository in the (BinPkgs/Src) source folder:
$ cd Dev/BinPkgs/Src
$ git clone https://github.com/fw4spl-org/fw4spl-deps.git
Note
Optional: You may also clone extension repositories like fw4spl-ext-deps. Additional dependency repositories must be cloned in the same directory as fw4spl-deps and they will be automatically discovered and then can be enabled via CMake.
- Ensure that all the cloned repositories are on the same branch.
- Update the cloned repositories to the lastest stable tag.
- Go into your Build directory (Debug or Release) : here is an example if you want to compile in DEBUG
$ cd Dev/BinPkgs/Build/Debug
Configuration
To build the dependencies, you must configure the project with CMake into the Build folder. As any CMake based project, there are three different ways to perform that.
1. Command-line
In this case, you give all the necessary variables on the command-line in one shot :
$ cd Dev/BinPkgs/Build/Debug
$ cmake ../../Src/fw4spl-deps -DCMAKE_INSTALL_PREFIX=Dev/BinPkgs/Install/Debug -DCMAKE_BUILD_TYPE=Debug
2. NCurses based editor
This editor allows to set the required each variable in a more interactive way :
$ cd Dev/BinPkgs/Build/Debug
$ ccmake ../../Src/fw4spl-deps
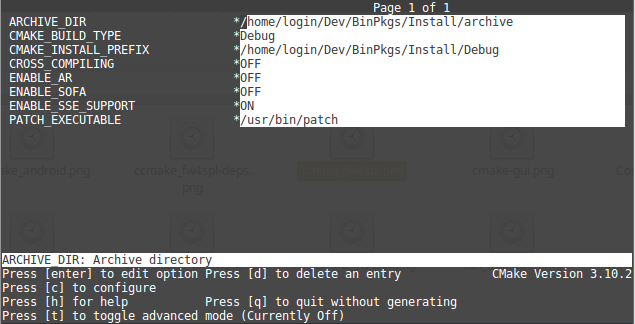
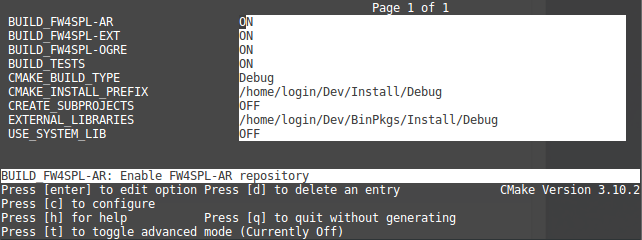
Then change the following CMake variables:
CMAKE_INSTALL_PREFIX: set the install location, hereDeps/BinPkgs/Install/DebugCMAKE_BUILD_TYPE: set the build type ‘Debug’ or ‘Release’ENABLE_SSE_SUPPORT: enable SSE support. We need that to ensure coherency of the SSE support accross all dependencies. This option will also be forwarded to FW4SPL when building it.BUILD_FW4SPL-EXT-DEPS: allows to enable/disable the fw4spl-ext-deps if you cloned it.
Press “c” to configure.
The following options are also available (some of the options will be needed for the optional source repositories):
ENABLE_AR: Build fw4spl-ar dependencies (OpenCV, PCL, OpenIGTLink…).ENABLE_OGRE: Build Ogre3D and its dependencies (necessary for fw4spl-ogre).ENABLE_CUDA: Enable CUDA support in some libraries (OpenCV, PCL, libSGM). This requires Cuda library to be installed on the system.ENABLE_SOFA: Build sofa.ENABLE_EXTRAS: Build dependencies that are not used currently in the open-source repositories (Odil, Bullet, realsense, libSGM,…).ENABLE_EXPERIMENTAL_DEPS: Build experimental libraries (you shouldn’t use it, moreover this option is only available with fw4spl-ext-deps).
When you’re done, generate the code by pressing “g” on NCurses based editor or click on “generate” on gui.
Warning
Do not compile debug and release with the same Build and Install folders. If you followed the recommended folder layout, this should be fine.
3. Qt based gui
$ cd ~/Dev/BinPkgs/Build/Debug
$ cmake-gui ../../Src/fw4spl-deps
You can then edit the same options than with ccmake.
Toolchain
The toolchain allows to cross-compile for Android by specifying all the necessary variables (compiler, target system, etc …). Currently, the toolchain we use is a modified version of this toochain from the github user taka-no-me (fork of the OpenCV project).
- Download the toolchain:
git clone https://github.com/fw4spl-org/android-cmake.git ~/Dev/Droid
Project configuration
To build the dependencies, you must configure the project with CMake into the Build folder. As any CMake based project, there are three different ways to perform that.
1. Command-line
In this case, you give all the necessary variables on the command-line in one shot :
$ cd ~/Dev/Deps/Build/Debug
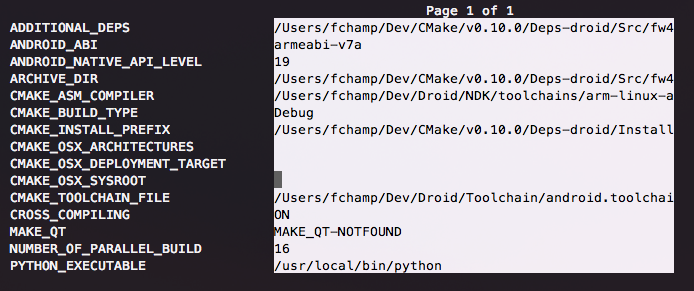
$ cmake ../Src/fw4spl-deps -DCMAKE_INSTALL_PREFIX=~/Dev/Deps/Install/Debug -DCMAKE_BUILD_TYPE=Debug -DCROSS_COMPILING=ON -DANDROID_NATIVE_API_LEVEL=21 -DCMAKE_TOOLCHAIN_FILE=~/Dev/Droid/android.toolchain.cmake
2. NCurses based editor
This editor allows to set the required each variable in a more interactive way :
$ cd ~/Dev/Deps/Build/Debug
$ ccmake ../Src/fw4spl-deps
Then change the following CMake variables:
CMAKE_INSTALL_PREFIX: set the install location, here~/Dev/Deps/Install/DebugCMAKE_BUILD_TYPE: set the build type ‘Debug’ or ‘Release’CROSS_COMPILING: set to ‘ON’
Press “c” to configure. Now you have got two new variables to set:
ANDROID_NATIVE_API_LEVEL: set to ‘21’CMAKE_TOOLCHAIN_FILE: set to ~/Dev/Droid/android.toolchain.cmake
Press “c” to configure and then “g” to generate the makefiles.
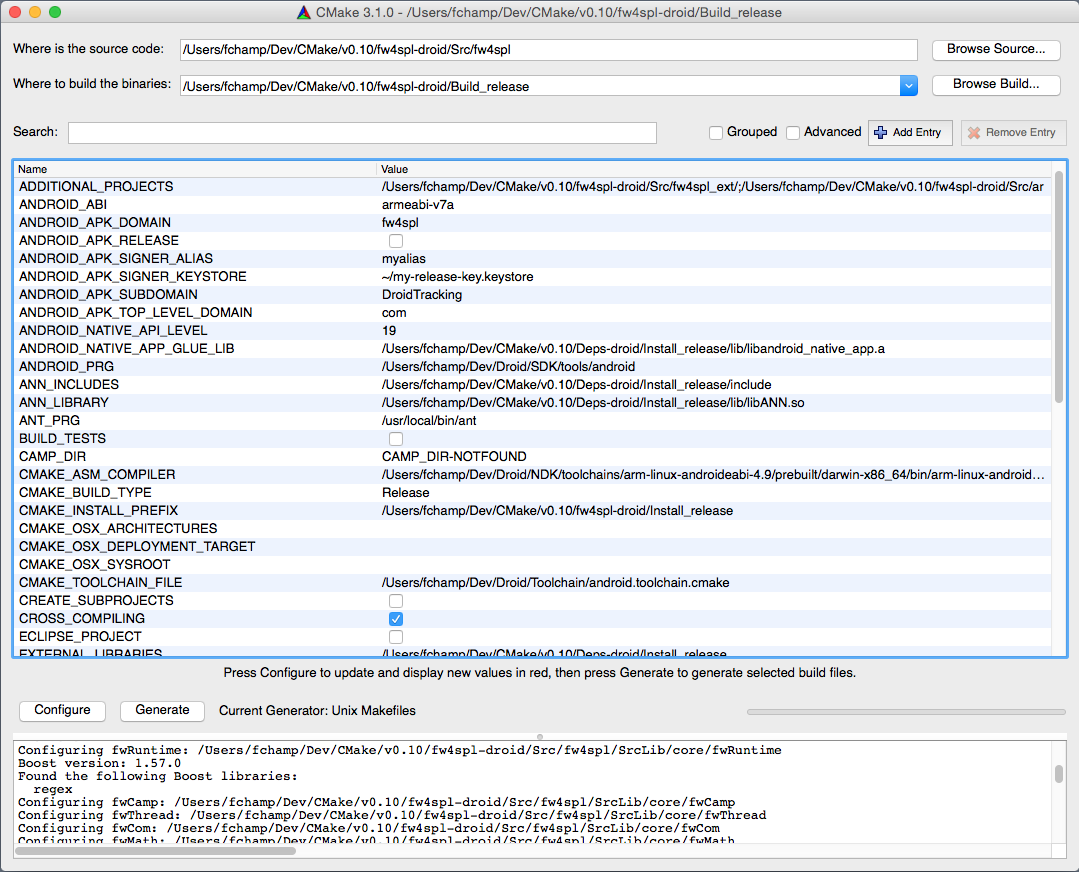
3. Qt based gui
$ cd ~/Dev/Deps/Build/Debug
$ cmake-gui ../Src/fw4spl-deps
Like ccmake, change the following CMake variables:
CMAKE_INSTALL_PREFIX: set the install location, here~/Dev/Deps/Install/DebugCMAKE_BUILD_TYPE: set the build type ‘Debug’ or ‘Release’CROSS_COMPILING: set to ‘ON’
Press “c” to configure. Now you have got two new variables to set:
ANDROID_NATIVE_API_LEVEL: set to ‘21’CMAKE_TOOLCHAIN_FILE: set to ~/Dev/Droid/android.toolchain.cmake
Click on “configure” then “generate”.
Warning
Do not compile debug and release with the same Build and Install folders. If you followed the recommended folder layout, this should be fine.
Warning
For Windows host platform, do not put the bin/ folder of git in the PATH of your build terminal. It may cause troubles with Qt compilation (some Makefiles are badly generated with simple quotes).
Warning
Do NOT use ninja to compile the dependencies, it causes conflict with qt compilation.
If you get compilation errors at this step, please ensure you installed all the requirements, especially those for Qt.
Source
$ cd Dev/Src
$ git clone https://github.com/fw4spl-org/fw4spl.git
Note
- Optional: You can also clone these extension repositories:
- fw4spl-ar contains functionalities for augmented reality (video tracking for instance).
- fw4spl-ext contains experimental code.
- fw4spl-ogre contains a 3D backend using Ogre3D.
- Ensure that all the cloned repositories are in the same folder as fw4spl. They will be automatically discovered and then can be enabled via CMake.
- Ensure that all the cloned repositories are on the same branch.
- Update the cloned repositories to the same tag.
- Clone fw4spl-droid repository into your source directory:
$ cd ..
$ git clone https://github.com/fw4spl-org/fw4spl-droid.git fw4spl-droid
$ cd fw4spl-droid
$ git checkout master
Note
- Optional: You can also clone these extension repositories:
- fw4spl-ar contains functionalities for augmented reality (video tracking for instance).
- fw4spl-ext contains experimental code.
- fw4spl-ogre contains a 3D backend using Ogre3D.
- Ensure that all the cloned repositories are in the same folder as fw4spl. They will be automatically discovered and then can be enabled via CMake.
- Ensure that all the cloned repositories are on the same branch.
- Update the cloned repositories to the same tag.
- Go into your Build directory (Debug or Release) : here is an example if you want to compile in debug:
$ cd Dev/Build/Debug
Now you have to configure the project. You can use one of the three tools explained above.
Also, for FW4SPL, we recommend to use the Ninja generator. It builds faster, and is much better for everyday use because of how fast it is at figuring out which files need to be built. In other words, with Ninja the compilation starts instantly whereas Make spends a dozen of seconds to check what should be compiled before actually compiling something. So if you plan to develop with FW4SPL, go with Ninja. If you only want to give a single try, you can live with the standard “Unix Makefiles” generator.
Configuration
1. NCurses based editor
To use make, here with ccmake :
$ cd Dev/Build/Debug
$ ccmake ../../Src/fw4spl
To use ninja :
$ cd Dev/Build/Debug
$ ccmake -G Ninja ../../Src/fw4spl
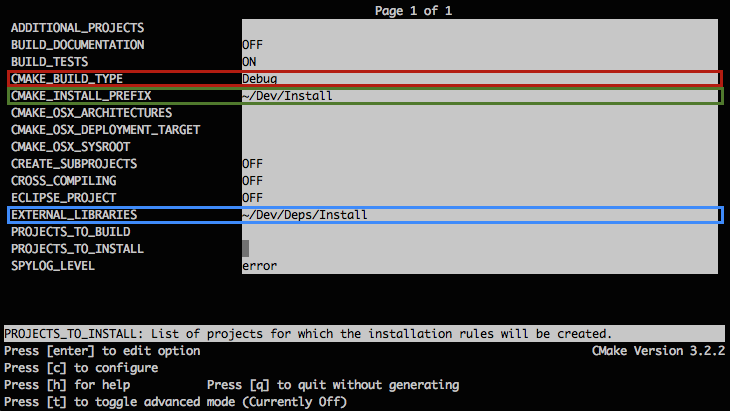
- Change the following cmake arguments
CMAKE_INSTALL_PREFIX: set the install location (~/Dev/Install/Debug or Release)CMAKE_BUILD_TYPE: set to Debug or ReleaseEXTERNAL_LIBRARIES: set the install path of the third party libraries you compiled before.(ex : ~/Dev/Deps/Install/Debug)PROJECTS_TO_BUILD: set the list of the projects you want to build (ex: PoC09Android, …), each project should be separated by “;”PROJECTS_TO_INSTALL: set the name of the application to installCROSS_COMPILING: set to ‘ON’
Press “c” to configure. Now you have got two new variables to set:
ANDROID_NATIVE_API_LEVEL: set to ‘21’CMAKE_TOOLCHAIN_FILE: set to ~/Dev/Droid/android.toolchain.cmake
Note
- If
PROJECTS_TO_BUILDis empty, all application will be compiled - If
PROJECTS_TO_INSTALLis empty, no application will be installed
Press “c” to configure and then “g” to generate the makefiles.
Note
To generate the projects in release mode, change CMake argument CMAKE_BUILD_TYPE to Release both for fw4spl and fw4spl-deps
Then, according to the generator you chose, build FW4SPL with make :
# Adjust the number of cores depending of the CPU cores and the RAM available on your computer
$ make -j4
Or with ninja:
$ ninja
If you didn’t specify anything in PROJECTS_TO_BUILD you may also build specific targets, for instance:
$ ninja PoC09Android
To deploy the application, connect your Android device to the USB port, be sure that it is in developer mode and that USB debugging is enabled. Then run:
$ ninja install
Thanks to Gradle and adb, the application will be packaged and copied automatically to your device.