Installation for Linux
Prerequisites for Linux users
If not already installed:
- Install git
- Install gcc The minimal version required is 4.8 or clang The minimal version required is 3.5
- Install Python 2.7
- Install CMake. The minimal version required is 3.7 if you want to compile with precompiled headers (build twice faster, enabled by default). Otherwise you can use a 3.1 version.
- Install Ninja
Depending on which linux distribution you use, for example on Debian/Ubuntu/Mint you can run the following command to download and install these tools:
$ apt-get install build-essential ninja-build python2.7 git cmake
Warning
If the CMake version of your distribution is not sufficient (Mint 17 for instance ships only the 2.18 version), you can easily grab it on the Kitware website. Download the binary version (much easier than compiling yourself), extract it to a folder (i.e. /home/login/software/cmake/) and add the bin/ folder inside it to your PATH environment variable:
# ~/.bashrc
export PATH=/home/login/software/cmake/bin:$PATH
Few basic development libraries need to be installed first: zlib, iconv, jpeg, png, tiff, freetype, libxml, expat, and icu. On Mint 18.x for instance, you can install them using the following command :
$ sudo apt-get install libz3-dev libiconv-hook-dev libpng12-dev \
  libjpeg-turbo8-dev libtiff5-dev libfreetype6-dev libxml2-dev \
  libexpat1-dev libicu-dev
Next, we also need to install specific development libraries for Qt. These requirements are detailed here:
Follow the instructions there to install the necessary packages on your system for Build essentials, libxcb and QtMultimedia. For the latter, please note that we use gstreamer-1.0 by default, so please replace libgstreamer0.10-dev and libgstreamer-plugins-base0.10-dev by libgstreamer1.0-dev and libgstreamer-plugins-base1.0-dev. You can safely ignore instructions for QtWebKit and QtWebEngine, we don’t build them.
Since we build Qt with openssl support you also need to install libssl-dev (be sure that the version is equal or upper to 1.0.0).
libudev-dev and libusb-1.0.0-dev are required by the OpenNI library. Last for VTK we also need the X Toolkit Intrinsics library headers, that you can easily install for instance on a Debian-based distribution with the packages libxt-dev, libxrandr-dev and libxaw7-dev.
If you are building the dependencies with the fw4spl-ext-deps additional dependencies, the VLC libraries are also needed, regarding to streaming capabilities, and thus the packages: libvlc-dev, libvlccore-dev and vlc-nox, are required.
Finally, please note that we provide Dockerfile at this link. The commands for dependency installation are provided there.
FW4SPL installation
FW4SPL uses CMake as build system.
We strongly recommend to build FW4SPL by separating source files, build files and install files. So we propose the following folders layout :
- Deps/Build/Debug
- Deps/Build/Release
- Deps/Src
- Deps/Install/Debug
- Deps/Install/Release
- Dev/Build/Debug
- Dev/Build/Release
- Dev/Src
- Dev/Install/Debug
- Dev/Install/Release
Of course you can name the folders as you wish, or choose a different layout, but keep in mind to not build inside the source directory. This is strongly discouraged by CMake authors.
Here are the details, if you need some help to create this folders hierarchy :
- Create a third party folder (Deps)
$ mkdir Deps
- Create into “Deps” the source, build and install directories
$ mkdir Deps/Src Deps/Build Deps/Install
- Create sub-folders to separate Debug and Release compilations
$ mkdir Deps/Build/Debug Deps/Build/Release Deps/Install/Debug Deps/Install/Release
- Then create a “Dev” directory, for FW4SPL
$ mkdir Dev
- Create into “Dev” the source, build and install directories
$ mkdir Dev/Src Dev/Build Dev/Install
- Create sub-folders to separate Debug and Release compilations
$ mkdir Dev/Build/Debug Dev/Build/Release Dev/Install/Debug Dev/Install/Release
Dependencies
We need first to build the third-party librairies. We will now fetch the scripts that allow to build them and then launch the compilation.
- Clone the repository into your source directory of Deps:
$ cd Deps/Src
$ git clone https://github.com/fw4spl-org/fw4spl-deps.git fw4spl-deps
- Go into fw4spl-deps folder and update to the latest stable version:
$ cd fw4spl-deps
$ git checkout fw4spl_0.11.0
- Go into your Build directory (Debug or Release) : here an example if you want to compile in DEBUG
$ cd ../../..
$ cd Deps/Build/Debug
Project configuration
To build the dependencies, you must configure the project with CMake into the Build folder. As any CMake based project, there are three different ways to perform that.
1. Command-line
In this case, you give all the necessary variables on the command-line in one shot :
$ cd ~/Deps/Build/Debug
$ cmake ../../Src/fw4spl-deps -DCMAKE_INSTALL_PREFIX=~/Deps/Install/Debug -DCMAKE_BUILD_TYPE=Debug
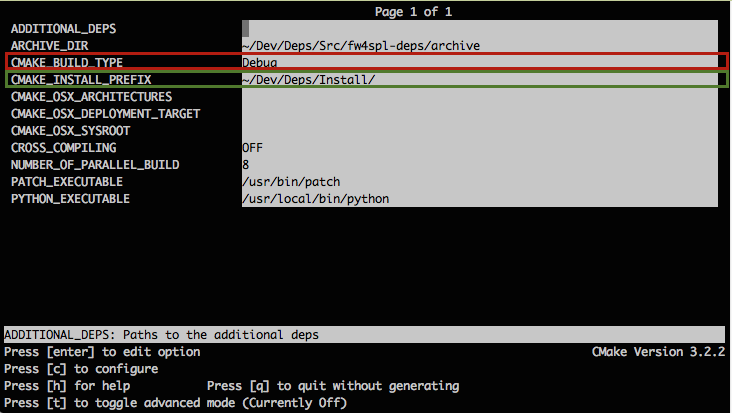
2. NCurses based editor
This editor allows to set the required each variable in a more interactive way :
$ cd ~/Deps/Build/Debug
$ ccmake ../../Src/fw4spl-deps
Then change the following CMake variables:
CMAKE_INSTALL_PREFIX: set the install location, here~/Deps/Install/DebugCMAKE_BUILD_TYPE: set the build type ‘Debug’ or ‘Release’
Press “c” to configure and then “g” to generate the makefiles.
3. Qt based gui
$ cd ~/Deps/Build/Debug
$ cmake-gui ../../Src/fw4spl-deps
Like ccmake, change the following CMake variables:
CMAKE_INSTALL_PREFIX: set the install location, here~/Deps/Install/DebugCMAKE_BUILD_TYPE: set the build type ‘Debug’ or ‘Release’
Click on “configure” then “generate”.
Warning
Do not compile debug and release with the same Build and Install folders. If you followed the recommended folder layout, this should be fine.
Compilation
Now you can compile the FW4SPL dependencies with make in the console, it will automaticaly download, build and install each dependency.
# Adjust the number of cores depending of the CPU cores and the RAM available on your computer
$ make -j4
Warning
Do NOT use ninja to compile the dependencies, it causes conflict with qt compilation.
If you get compilation errors at this step, please ensure you installed all the requirements, especially those for Qt.
Source
- Clone fw4spl repository into your source directory:
$ cd Dev/Src
$ git clone https://github.com/fw4spl-org/fw4spl.git fw4spl
- Go into fw4spl folder and update to the latest stable version:
$ cd fw4spl
$ git checkout fw4spl_0.11.0
- Go into your Build directory (Debug or Release) : here an example if you want to compile in debug:
$ cd Dev/Build/Debug
- Now you have to configure the project. You can use one of the three tools explained above.
Also, for FW4SPL, we recommend to use the Ninja generator. It builds faster, and it is much better for everyday use because it is fast as hell to check the files you need to compile. In other words, with Ninja the compilation starts instantly whereas Make spends a dozen of seconds to check what should be compiled before actually compiling something. So if you plan to develop with FW4SPL, go with Ninja. If you only want to give a single try, you can live with the standard “Unix Makefiles” generator.
To use make, here with ccmake :
$ ccmake ../../Src/fw4spl
To use ninja :
$ ccmake -G Ninja ../../Src/fw4spl
- Change the following cmake arguments
CMAKE_INSTALL_PREFIX: set the install location (~/Dev/Install/Debug or Release)CMAKE_BUILD_TYPE: set to Debug or ReleaseEXTERNAL_LIBRARIES: set the install path of the third party libraries you compiled before.(ex : ~/Deps/Install/Debug)PROJECT_TO_BUILD: set the list of the projects you want to build (ex: VRRender, Tuto01Basic ...), each project should be separated by ”;”PROJECT_TO_INSTALL: set the name of the application to install
Note
- If
PROJECT_TO_BUILDis empty, all application will be compiled - If
PROJECT_TO_INSTALLis empty, no application will be installed

Press “c” to configure and then “g” to generate the makefiles.
Note
To generate the projects in release mode, change CMake argument CMAKE_BUILD_TYPE to Release both for fw4spl and fw4spl-deps
Then, according to the generator you chose, build FW4SPL with make :
# Adjust the number of cores depending of the CPU cores and the RAM available on your computer
$ make -j4
Or with ninja:
$ ninja
If you didn’t specify anything in PROJECT_TO_BUILD you may also build specific targets, for instance:
$ ninja Tuto01Basic VRRender
Launch an application
After a successful compilation the application can be launched with the fwlauncher program from FW4SPL. The profile.xml of the application in the build folder has to be passed as argument to the fwlauncher call in the console.
$ bin/fwlauncher Bundles/MyApplication_Version/profile.xml
Example:
$ cd /Dev/Build/Debug
$ bin/fwlauncher Bundles/VRRender_0-9/profile.xml
Extensions
FW4SPL has two main extension repositories:
- fw4spl-ar: extension of fw4spl repository, contains functionalities for augmented reality (video tracking for instance).
$ cd Dev/Src
$ git clone https://github.com/fw4spl-org/fw4spl-ar.git fw4spl-ar
$ cd fw4spl-ar
$ git checkout fw4spl_0.11.0
fw4spl-ogre: another extension of fw4spl, contains a 3D backend using Ogre3D.
$ cd Dev/Src $ git clone https://github.com/fw4spl-org/fw4spl-ogre.git fw4spl-ogre $ cd fw4spl-ogre $ git checkout fw4spl_0.11.0
Then you have to reconfigure your CMake project:
$ cd ../../Build/Debug
$ ccmake .
Modify `̀ ADDITIONAL_PROJECTS`̀ : set the source location of fw4spl-ar and fw4spl-ogre separated by a semi-colon.
~/Dev/Src/fw4spl-ar/;~/Dev/Src/fw4spl-ogre/
Recommended software
The following programs may be helpful for your developments: