Installation for Windows
Prerequisites
If not already installed:
- Install git
- Optionally you can install GitKraken to manage your repositories
- Install Visual Studio 2015 Community Be sure to launch it at least once while being logged with your user account. Doing so will ensure that Visual Studio is correctly registered, because otherwise, the build of some dependencies may fail.
- Install Python 2.7
- Install CMake
- Install jom
- Install ninja
Qt is an external library used in FW4SPL. For the successful compilation of Qt for FW4SPL, please see the following requirements:
Source tree layout
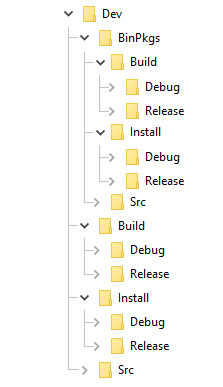
Good practices in FW4SPL recommend to separate source files, build and install folders. So to prepare the development environment:
Create a development folder (Dev)
Create a build folder (Dev\Build)
- Add a sub folder for Debug and Release.
Create a source folder (Dev\Src)
Create a install folder (Dev\Install)
- Add a sub folder for Debug and Release.
To prepare the third party environment:
Create a third party folder (BinPkgs)
Create a build folder (BinPkgs\Build)
- Add a sub folder for Debug and Release.
Create a source folder (BinPkgs\Src)
Create an install folder (BinPkgs\Install)
- Add a sub folder for Debug and Release.
Of course you can name the folders as you wish, or choose a different layout, but keep in mind to not build inside the source directory. This is strongly discouraged by CMake authors.
Set the environment for a x64 version. To compile BinPkgs and sources, you must use the ‘VS2015 x64 Native Tools Command Prompt’
Dependencies
First, we need first to build the third-party librairies. We will now fetch the scripts that allow to build them and then launch the compilation.
Clone the following repository in the (BinPkgs/Src) source folder:
> cd Dev/BinPkgs/Src
> git clone https://github.com/fw4spl-org/fw4spl-deps.git
Note
Optional: You may also clone extension repositories like fw4spl-ext-deps. Additional dependency repositories must be cloned in the same directory as fw4spl-deps and they will be automatically discovered and then can be enabled via CMake.
- Check if all the cloned repositories are on the same branch.
- Update the cloned repositories to the lastest stable tag.
Warning
Be sure to be in the ‘VS2015 x64 Native Tools Command Prompt’
Note
Make sure that CMake executable (cmake.exe and cmake-gui.exe) location is present in your PATH environment variable.
- SET PATH=%PATH%;D:\Tools\CMake\bin
Note
Make sure that JOM executable (jom.exe) location is present in your PATH environment variable.
- SET PATH=%PATH%;D:\Tools\jom
- Go into your Build directory (Debug or Release) : here is an example if you want to compile in DEBUG
> cd Dev\BinPkgs\Build\Debug
- Call cmake-gui by executing command : cmake-gui
> cmake-gui
Configuration
Note
All the generation options are specified in ‘Dependencies generation’
Set the desired Build directory (e.g. Dev\BinPkgs\Build\Debug or Release)
Set the desired Source directory (e.g. Dev\BinPkgs\Src\fw4spl-deps)
Click on “configure”.
During Configure, choose the generator ‘NMake Makefiles JOM’.
Set the following arguments:
CMAKE_INSTALL_PREFIX: set the install location (e.g. Dev\BinPkgs\Install\Debug or Release).CMAKE_BUILD_TYPE: set to Debug or Release.BUILD_FW4SPL-EXT-DEPS: allows to enable/disable the fw4spl-ext-deps if you cloned it.
Click on “configure”.
Generation
Set the following options (some of the options will be needed for the optional source repositories):
ENABLE_AR: Build fw4spl-ar dependencies (OpenCV, PCL, OpenIGTLink…).ENABLE_OGRE: Build Ogre3D and its dependencies (necessary for fw4spl-ogre).ENABLE_CUDA: Enable CUDA support in some libraries (OpenCV, PCL, libSGM). This requires Cuda library to be installed on the system and present in your PATH.ENABLE_SOFA: Build sofa.ENABLE_EXTRAS: Build dependencies that are not used currently in the open-source repositories (Odil, Bullet, realsense, libSGM,…).ENABLE_EXPERIMENTAL_DEPS: Build experimental libraries (you shouldn’t use it, moreover this option is only available with fw4spl-ext-deps).
- click on “generate”.
Build
Compile the FW4SPL dependencies using jom in the console:
- go to the build directory (e.g. Dev\BinPkgs\Build\Debug or Release)
- Use “jom all” to compile all the dependencies
- Use “jom name_of_target” to compile only the desired target
> cd Dev\\BinPkgs\\Build\\Debug
> jom install
- All the generated libraries are in the install directory (e.g. Dev/BinPkgs/Install/Debug or Release)
Note
To prevent any future problems with source generation, ensure that all the libraries have been compiled
Source
> cd Dev\Src
> git clone https://github.com/fw4spl-org/fw4spl.git
Note
- Optional: You can also clone these extension repositories:
- fw4spl-ar contains functionalities for augmented reality (video tracking for instance).
- fw4spl-ext contains experimental code.
- fw4spl-ogre contains a 3D backend using Ogre3D.
- Ensure that all the cloned repositories are in the same folder as fw4spl. They will be automatically discovered and then can be enabled via CMake.
- Ensure that all the cloned repositories are on the same branch.
- Update the cloned repositories to the same tag.
- Go into your Build directory (Debug or Release) : here is an example if you want to compile in debug:
$ cd Dev/Build/Debug
Warning
Be sure to be in the ‘VS2015 x64 Native Tools Command Prompt’
Note
Make sure that CMake executable (cmake.exe and cmake-gui.exe)location is present in your PATH environment variable.
- SET PATH=%PATH%;D:\Tools\CMake\bin
Note
Make sure that Ninja executable (ninja.exe) location is present in your PATH environment variable.
- SET PATH=%PATH%;D:\Tools\ninja
- Call the cmake-gui.
> cmake-gui
Configuration
- Set the desired Build directory (e.g. Dev\Build\Debug or Release)
- Set the desired Source directory (e.g. Dev\Src\fw4spl)
- Click on “configure”.
- During configure step, choose the generator ‘Ninja’ to compile FW4SPL sources.
Generation
Set the following arguments:
ADDITIONAL_PROJECTS: set the source location of fw4spl-ar, fw4spl-ext and fw4spl-ogre, separated by “;”.CMAKE_INSTALL_PREFIX: set the install location (e.g. Dev\Install\Debug).CMAKE_BUILD_TYPE: set to Debug or Release.EXTERNAL_LIBRARIES: set the install path of the dependencies install directory (e.g. Dev\BinPkgs\Install\Debug or Release).PROJECTS_TO_BUILD: set the names of the applications to build (see DevSrcApps or DevSrcSamples, ex: VRRender, Tuto01Basic …), each project should be separated by “;”.ECLIPSE_PROJECT: check this box if you want to generate an Eclipse project.
- If you want to generate installers:
PROJECTS_TO_INSTALL: set the names of the applications you want to install (i.e. VRRender).
Note
- If
PROJECTS_TO_BUILDis empty, all application will be compiled - If
PROJECTS_TO_INSTALLis empty, no application will be installed
Warning
Make sure the arguments concerning the compiler (advanced arguments) point to Visual Studio.
- click on “generate”.
Build
Compile the FW4SPL source using ninja in the console:
- go to the build directory (e.g. Dev\Build\Debug or Release)
- Use “ninja” if you want to compile all the applications set in CMake.
- Use “ninja name_of_application” to compile only one of the applications set in CMake.
> cd Dev\Build\Debug
> ninja
Launch an application
After a successful compilation the application can be launched with the fwlauncher.exe from FW4SPL. Therefore the profile.xml of the application in the build folder has to be passed as argument.
Note
Make sure that the external libraries directory is set to the path (set PATH=<FW4SPL Binpkgs path>\Debug\bin;<FW4SPL Binpkgs path>\Debug\x64\vc12\bin;%PATH%).
> cd Dev\Build\Debug
> .\bin\fwlauncher.exe share\MyApplication\profile.xml
Generate an installer
After setting the applications for which you want to generate installers in the PROJECTS_TO_INSTALL CMake variable and generating the code, follow these two steps:
- Run ninja install application_to_install in the Build directory
- Run ninja package in the Build directory
The installer will be generated in the Build directory.
Recommended software
The following programs may be helpful for your developments:
- Eclipse CDT: Eclipse is a multi-OS Integrated Development Environment (IDE) for computer programming.
- Notepad++: Notepad++ is a free source code editor, which is designed with syntax highlighting functionality.
- ConsoleZ: ConsoleZ is an alternative command prompt for Windows, adding more capabilities to the default Windows command prompt. To compile FW4SPL with the console the windows command prompt has to be set in the tab settings.